Getting Top Quality from Medium Format
ADDENDUM ADDED at the end, April 24, 2009
It's really a gigantic topic, but I want to share some of the important things that I've had to learn during my recent efforts to get an optimally-performing medium format digital camera system built and to learn how to use it effectively. My take on this derives from my challenge of making landscape images of large format equivalent quality as best I can, commensurate with the kinds of subject matter that most interest me. So this article is largely about finding the capability to make pictures that look, just in terms of sheer image detail, as though they had been made with a modern 4x5, 5x7, 8x10 or what not (many aspect ratios and total image detail content levels are possible on account of stitching).
One of the most important things that one needs to learn is just what level of quality is possible from a digital back. This is surprisingly difficult, because so few existing medium-format samples are up to the level of what is possible, that one can look at pictures for a long time before ever seeing one that reveals how good it can get. Oddly, the back makers don't all supply downloadable images on their sites. Hasselblad has some now, I see, and they continue to allow you to browse, at up to 100%, a half-dozen sample images. Even so, I don't think they've stumbled into the best sharpening possible. At any rate, it's hard to know when something isn't up to snuff, when you don't know how good it can be. I can say, though, that I am very impressed by how good 39 million pixels can look if everything is done about right, and I am optimistic that in practice I will find it feasible to stay at or near an optimal level of quality for the great majority of the pictures I make. I hope that the level of consistency I enjoyed with my 4x5 work can happen with the new camera too. I'll find out over the coming years.
I should also mention, before I get going, that I had intended to also write a long article about the pros and cons and features of the many very interesting medium format camera systems, including the ARCA-SWISS R m3d, the ALPAs, and some of the other fascinating choices. For most of the many months prior to finally finding out enough to make the choice of a system, I had expected that the R m3d would be my eventual choice, but toward the end I learned some critical things about the Mamiya. Those things included that: it's lenses, when they are good, are just as good as the German digital lenses; there was a way to focus it manually with precision after all, as detailed below; and that a Mamiya outfit based on three zooms would not only have a fantastic range of focal length choices, but actually be more compact than either a seven-lens R m3d outfit or an ALPA TC outfit. Another critical decision had to do with not finding a satisfactory solution to the issue of removing the back to use the ground glass and all possible workarounds for that, including a more precise viewfinder, electronic preview, a sliding back adapter, and a built-in sliding back, none of which quite worked out for me, though they might have been fine were I not needing to do things like work in light rain, etc. Also, there was finally coming to the conclusion that it would be quite unpleasant to be working with a view camera when the sensor is prone to strong and highly non-symmetrical color and brightness shifts due to light hitting it at steeper angles, as the Kodak 39 MP sensor is (the Dalsa sensors are far less so). Lastly, the scary prospect of leaving a tilt behind (having always relied on a back tilt for my work with the 4x5) had to be addressed with a combination of knowing the feasible depth of field from the new format, which includes understanding just how far one can stop down and recover good sharpness after diffraction has blurred the image, and knowing just how robust and usable Helicon Focus would soon be for focus blending of two or more exposures for more depth of field. As you may have read, I was able to address that issue by helping with the development of the latest versions of Helicon Focus as explained in my article here, and I can also happily report that just today I received my first 64-bit version of Helicon Focus to test under OS 10.5, so the last major barrier to focus blending very large files has probably just been breached. So this article concentrates on the sharpness issues from the perspective of the two dominant SLR options, especially the Phase/Mamiya system, but does apply partially to the many other systems as well.
I want to cover these topics:
1) The problem with manual focussing and, in particular, how to make it work well with SLR cameras on a tripod using what I assume is a new (or at least little-known) method.
2) The need to verify that your back and your camera are in good focus calibration and how to test them. As my friend Max Strassman used to say in his printing business "Assume Nothing!".
3) The need to test every lens you purchase and my preferred methods for performing the tests.
4) My favorite sharpening methods, Bayer interpolation methods, DOF marks on fixed lenses, etc.
But first a few introductory issues:
The sensors in medium-format backs (33, 39, 50, 60 million pixels, etc.) can produce phenomenally sharp images, but all too often they don't, for a variety of reasons. My sense is that it is much easier to fail to reach the potential of these systems than it is for a competent view camera user to do the same with sheet film. The potential of the sensors I think goes well beyond what most people often see from them. The systems require phenomenal precision from the back, the camera body, the lenses, and the focussing methods (auto and manual focus both).
Not having anti-aliasing (blurring) filters, as the smaller format digital cameras have, opens the medium-format backs to potentially severe moire problems, which often show up as rainbow patterns when regularly-spaced textures in man-made objects are photographed. Fortunately, this is not an issue for the generally random textures of nature. Also, potentially software can or could deal with moire problems in processing, better than anti-aliasing filters can. The advantage is that the images are substantially sharper on a per-pixel basis, other factors held equal, especially prior to sharpening, but after as well.
My first impression of my P45+ back, in seeking to compare it to my Canon 5D (Mark I, since replaced with a Mark II), was that it was 2.5X sharper than the 5D, or the equivalent of 6.25X more pixels of equal detail, though it had 3X as many pixels. I attribute this mainly to the lack of the anti-aliasing filter over the sensor. The dynamic range was also substantially better.
Also, I saw compelling evidence the other day that the new P65+ is about 3X more resistant to moire than the P45+, owing in part to having a finer pixel pitch, but there must have been a lot more to it than that, otherwise finer structures would simply give the same result, yet they were not in the test target sample I was shown.
In order to get optimal results, a lot of things have to be just right, and because the sensors are so sharp, with pixels smaller than the short dimension of an E. coli bacterium, the system must achieve ultra-fine tolerances for the placement of the plane of focus, etc.
Also, the Bayer interpolation algorithm must be first rate. Capture One and RAW Developer both do extremely well in this regard. And at some point or points in your imaging process, sharpening needs to be brought to bear, but the field of sharpening tools includes a lot which leave a great deal to be desired -- at least compared to the best.
So, on to topic #1, how to get critical manual focus with a medium-format SLR:
If your eyes won't focus pretty close to the end of your own nose anymore, then focussing a 4x5 or larger view camera requires the use of a loupe such as the Schneider 6X that I used for many years. The view thus obtained on the groundglass makes it very easy to see exactly where the plane of focus is, with very high magnification, relative to the image being formed — assuming the ground glass is well-calibrated to position it's ground surface in the same plane that the emulsion of the film sits after it is inserted. Focussing by eye from 8 inches away is not good enough for the 4x5 under most circumstances. Focussing a tiny view camera ground glass for use with a digital back, is generally thought to require 8X to 20X magnification, though the groundglass may be too coarse to work well above 6X or 8X!
Similarly, the image that you see through the viewfinder of a Mamiya AFD 645-format SLR or a Hasselblad H camera is a lot like what you see looking at a 4x5 ground glass from 7 to 8 inches away. Add to that the sharper capabilities of the sensor, and you can begin to see that the image seen through the eyepiece of the camera is simply nowhere near magnified enough to focus well unless the subject has a very high depth of field requirement and a fast lens (e.g. f/2.8). We have to find a way to magnify the image a lot to see the focussing screen well enough to focus carefully.
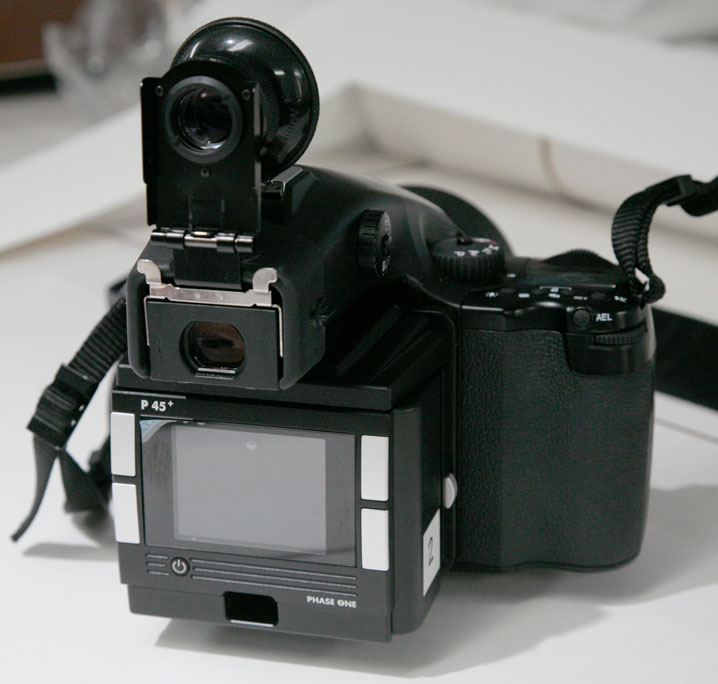
Mamiya has a 2X flip-down eyepiece magnifier, shown here, what they call "Magnifier FD402". When it's in place, the image you get is about the same as using an 8X loupe on the groundglass for a sensor, i.e. barely enough magnification to focus critically if you are very careful. It sells for something over $200 and is quite effective, but its magnification is only barely sufficient, and it only works for the central 40% or so of the focussing screen area, if that. Barring a better solution, this one is highly recommended. It is a bit awkward when not in use, but it is one major advantage of the Mamiya system over the Hasselblad system, for example. But read on.
This is an AFD II body with the Mamiya 2X in place, and the 55-110 zoom.


But what about focussing off axis? In the corners? Critically? For the time being, we'll assume that both the camera (including the precise plane of the focussing surface of the focussing screen) and the back (i.e. the focussing surface of the sensor) are in perfect calibration from their respective factories. If not, manual focussing will not work right — you focus at one distance, but get another distance in the file (unless both should be off in the exact same way by coincidence). Despite protestations from certain people at Phase One, my experience (as outlined in my long article posted here on my site, April 5, 2009) has shown that these assumptions are surprisingly likely to be unmet. We'll talk about that later in this article, including how to diagnose it.
The Mamiya eyepiece magnifier for their 645 cameras is essentially a 2X telescope. It's not a loupe! I realized that if I held it in my fingers, off the camera, but close to the eyepiece, that I could aim it at the corners of the image on the focussing screen (or anywhere else in the image), and once the magnifier itself was focussed well for any given part of the focussing screen, I could see a far better view of fine detail anywhere in the image than I could see without a magnifier, but I wanted more magnification (2.5 to 3X and maybe even 4X or 5X) and something easier to hold on to and hang around my neck. So I undertook a global search for low-powered monoculars, and eventually located dozens of different ones. I narrowed those down to the four to six most promising models and purchased four of those, further narrowing down my list of favorites to two (plus the two I haven't been able to try yet):
First, the inexpensive one that works: A Russian 2.5X monocular, available from various vendors on eBay in China for between $5 and $10 plus shipping. It has a 17.5 mm wide, coated glass objective lens (a little larger than optimal for this use but OK), and a metal finger-ring, as shown. It's 35 mm tall -- tiny. It works, though the field of view isn't exactly huge. The field of view is fuzzy-edged and the apparent angle of view is about 23 degrees. For the money, you can't lose. I carry it as a spare.

Second, the one that is most likely the best of all available instruments:
The Zeiss 3X monocular. They only make one 3X. It is sold in the U.S. as the "Zeiss Tripler", intended for tripling the magnification of one side of a pair of Zeiss binoculars by using one of six varieties of plastic eyepiece adapter rings press-fit onto the front end of the 3X, therefore six different types of Triplers are shown by various vendors, and strangely the price can vary by model, even though the plastic adapter ring retails separately for about $25. I have seen the Tripler selling for between $250 and $430 dollars, and the 3X is as fine an instrument as you might imagine a modern Zeiss monocular to be. The field of view has a crisp edge and the apparent viewing angle (how large the image circle looks when you look into it) is about 36 degrees, which is quite good for this class of instrument, the optical correction overall is first rate, and the physical build is superb. Twist to focus. The minimum focussing distance is only a few inches (which is not useful for focussing the camera but is useful for looking closely at things which are close to you), with the minimum field of view being about 1.4". The objective lens diameter is 12 mm, which is ideal for use with a Mamiya 645 camera, due to the dimensions of the viewfinder's eyepiece (you don't want the view of the monocular to be vignetted by the camera's eyepiece, so monoculars with 25 mm wide objective lenses are no good for this!).
Here are two views of my Zeiss 3X after I pulled the adapter ring off the front end (and yes, the eyepiece is rubber):


It comes with a nice little, zippered leather case, which has a hole in the side for the neck band too, so you can leave it in the case while it's around your neck. It works very well on the Mamiya (but only if you are not using the Plus diopter eyepiece correction lens! It does not work to look across the optical axis through that lens.) and it works just fine with the one Hasselblad H2 that I've tried it with, which had their 35 mm lens attached.
Since the diameter of the Hasselblad eyepiece lens is wider than that of the Mamiya (and round), it may be the case that even monoculars with objective lens diameters are large as 18 mm would work OK. A friend has just tried the Zeiss 4X, which like the Zeiss 6X (both pictured below) focusses by push-pull action. As I had feared, this doesn't work while working with the camera, so forget about using these two.
![]() and here is the 6X (not to scale):
and here is the 6X (not to scale): 
Try this link to see them all on the Zeiss German website: http://www.zeiss.de/C12567A80033F8E4/?Open
From what I can see, it appears to be the case that the Hasselblad system does not offer any alternative eyepiece correction lenses, and I was able to test the 3X on an H2 and it worked fine, so it's probably safe to assume that all Hasselblad H users could use this technique, but as I mentioned above, if you're using the Plus diopter correction lens on the Mamiyas, forget it. This could be a problem with other camera types as well. If it turns out that 4X, 5X or 6X are comfortable degrees of enlargement, which seems likely, then some other monoculars which I had never considered until a few days ago may also turn out to work well, such as Nikon's 5 x 18 HG or the Vixen 4 x 12 and 6 x 16, pictured below, and perhaps several others. Just be sure their objective diameter does not exceed the opening dimensions of the eyepiece lens by more than a few millimeters at most, and see if you can try one before you buy it. Think about the neck strap and case too, which are not supplied with the lower-priced Vixens. Of these three, I would definitely lean toward the Nikon, for quality reasons, and the ease of connecting a strap, but the 15 mm objective diameter might prove to be too wide for it to work well with the Mamiya 645's.

![]()

![]()

Using the Zeiss 3X (or even the 2.5X Russian) I have found that I can, on balance, focus with the same average accuracy when manually focussing as when using the auto focus. However, each method has different weaknesses and so may fail under different circumstances to nail the focus (sufficient, for example, to shoot safely on a flat scene at f/5.6 or f/8 and sacrifice no sharpness to speak of — that's hard). This is something of a revelation, because it makes the Mamiya/Phase One camera system and the Hasselblad system capable of shooting in a way that's much more akin to using the view camera, and of planning and carrying out the focus adjustments necessary to make two or more frames at varying focussing distance for subsequent focus blending (see my article on focus blending advances here) or for many other purposes, such as focussing without having to re-aim the camera! I also find that I can check up on the auto focus in situations where the AF may not work well enough. One other important point to make is that to see the focus as readily as we can see it on a 4x5 ground glass with a 6X loupe, I am guessing we might need to use a 10X or greater monocular with the viewfinder of a medium-format SLR with a digital back, which is not possible. The magnifications don't line up because the precision demands of the sensor are so high. Still, 2X supplementary magnification on up can do the job if you put a little effort into getting the right instrument and learning how to use it.
The auto focus system in the Mamiya AFD III/Phase One body uses three AF sensors, the exact locations and shape of which are pictured in the PDF owners manual. There is a center cross, and a pair of vertical bars to the side (with the camera in horizontal orientation). The center cross is not shown in the viewfinder, but once you know its shape, it's easy to know exactly where it is. The shapes shown in the owners manual do precisely match the sensitive AF areas. I use the option to turn off the two side bars, which is controlled with a button on top of the camera, so that I can be sure of just what I'm focussing on (the center cross only). If there is a contrasty vertical line running vertically through the cross, the camera will focus perfectly on it (e.g. within less than one inch at eight feet), again assuming that the back and the body are in good focus calibration. If there is only a contrasty horizontal line running through the cross, the camera's accuracy will fall off to perhaps 3 or 4 inches at 8 feet. This is with the camera again in horizontal position. Memorize this, and you will be able to auto focus pretty reliably, when the subject permits. It is important to understand that any given camera body which has accurate AF may not have accurate MF, and the reverse may even be possible. Evaluate each separately before you decide the body you just purchased is OK!
With the AFD III/Phase Body, to disable the AF function of the shutter release (without messing with the lens barrel or the mode switch on the lower right front of the camera, as seen when facing the camera), you need to change custom function 19 from its default setting of zero to the setting "2". This causes the button on the front of the body, up high, near the shutter release, to become an On/Off switch for the AF function. When the AF is then turned off (disabled), the circular AF dot in the viewfinder remains lit all the time. I would then, with the AF turned on/enabled, point the camera at what I wanted to focus on, press the shutter half way down to focus, press the front button to turn off/disable the AF, re-aim the camera to compose, then trip the shutter without fear that the camera will re-focus on whatever happens to be in the center of the field of view.
Of course, it would be easier if they would just allow us to leave the AF out of the shutter release function, and simply use a button, like that front button, to activate an AF operation. I expect Phase One to bring this back in subsequent cameras, as it was also present in the AFD II (I believe -- I have one but I never used that camera with AF, nor tested this). I am told that this option is present is present in the Hasselblad H bodies.
On to item #2: backs and camera bodies which may not be in proper focus calibration:
Phase One's stated dimensional tolerance (not published) for the calibration of the plane of focus of their sensors is 12 microns (this is presumably the overall tolerance for the distance of the center of the sensor from the lens on the optical axis). That's 0.012 mm, or one half of one thousandth of an inch. It's a very tight tolerance, but the right one for these cameras to work optimally, and it's equal to 1/8th of the thickness of a sheet of inexpensive laser paper (which is 100 microns thick). If and when they meet that tolerance, things are definitely good, at least with the back. The camera body must also meet the same tolerance for the position of the focussing surface of the focussing screen in the camera, for manual focus to work correctly. The auto focus system is most likely typical of SLRs, which use a phase detection mechanism which relies on image information passing through a portion of the main mirror, which is then re-directed downward by a smaller, secondary mirror to the sensors. (See: http://en.wikipedia.org/wiki/Autofocus and http://www.flickr.com/photos/rnbc/2786765620/in/set-72157603099756613/) So the accuracy of the two focussing systems of the camera are largely independent of one another. I could also tell by the behaviors of a pair of Phase One bodies that this was so, because my second AFD body (my first Phase One body) was indeed out of focus calibration for manual focus, but was dead-on for auto focus, but the body I swapped it for was dead on for both. My first AFD body, an AFD II, came from the factory in correct focus calibration, however when I swapped the focussing screen for an optional model screen which makes stop-down light metering work right (for older, manual-focus lenses like my 105-210 zoom), the replacement focussing screen was wildly wrong in thickness and the focussing accuracy went way out the window — over 200 microns out. My first Phase One body focussed within 1" with AF at 8 feet (when there was an optimal line to focus on), but when focussing manually at 10 feet, the result was 11 feet, 3 inches. After swapping it for another body, both AF and MF were within an inch or so. So that's one out of three Mamiya bodies I've had which was defective for manual focussing calibration. Keep in mind that since manual focussing is so hard without supplementary magnification, most users will be off when they use MF anyway, and they will tend to blame themselves first, so bodies which are off for MF are likely to not come to the attention of Phase One or dealers, as users therefore fail to complain.
Just to complicate matters, the first loaner P45 back which I got from Phase One and which I used with my older AFD II body, while I waited for my P45+ to arrive in 2007, was also way out of focus calibration‚ some 175 microns out! This after having been told by my trusty (and trustworthy) dealer that they had never seen a single Phase One back that was out of focus, among probably hundreds sold (but that other brands had been). And then being told by Phase One USA that they had never seen one that was out of focus either. That back went back in trade for a new loaner back (after it wreaked havoc on a photo trip to Colorado) and was replaced with another loaner that was only 50 microns out (4X the spec). I was beginning to sense a pattern. The chances that one of these bodies, focussing screens, or backs was actually built so as to make focussing the camera work right was looking pretty slim. If it were true that none among hundreds or thousands of them had been out of focus, what do you suppose the odds were that I would get two out of two loaners that were out of focus calibration? Of course, I had to find a way to establish that it was the backs, and not the Mamiya body. The method was to find a friend (Charlie Cramer) with the exact same body and back types, establish that his combination was accurate every time for manual focus (and AF), at least when the 2X magnifier was used, and then swap backs without touching the lens while the camera was on a tripod, and re-shoot. His back was perfect on both bodies. My back was bad on both bodies. My back was very strongly implicated, to a high order or probability, as the culprit.
When the actual P45+ back arrived, it was good, at least not more than 20 microns off, further proving that my loaners had indeed both been bad. Focussing too close seems to be the norm when a back is off. When I focus on something these days, the result is in almost invariably in good focus, though being dead-on at f/5.6 is still tough to manage. Fortunately I don't need to do that more often than most of us do.
Long story short, as I outlined in my article published April 5, 2009 here), I quickly was able to find a very high incidence of apparent trouble with the focus calibration of the Phase One backs among the experiences of people I knew who had them. This problem is supposed to be nonexistent with their backs and that's one of the reasons I selected theirs over one of the other three brands. Doing rigorous experiments is difficult and sometimes one has no good means at hand to answer a question about a problem with focus, for example. But the other experiences I gathered were from serious and experienced photographers and I take them seriously as evidence of a problem which appears to be vastly more frequent than some claim (that of Phase One P45 and P45+ backs having their sensor be in the wrong plane, well outside of their own spec). Just to be clear, in my research, I found that five out of twelve backs were bad. Three or four of the bad ones were loaners. And I'm not counting yet another loaner that another friend had terrible focussing problems with, as he waited for his new P65+ to arrive, because his focussing skills left too much to be desired for me to fairly count that one, even though I would guess that it too was bad.
So thus far in my experience I have seen both a high incidence of backs out of calibration, and a high incidence (1 out of 3) of bodies being out of calibration for manual focussing only. And the only replacement focussing screen from Mamiya which I have tried was way out of calibration. And I haven't yet mentioned that in those cases where I have had the chance to examine more than one copy of a Mamiya lens, I have seen a shocking degree of variation in the quality from lens to lens. I will explain that in a later section, and how to test for it. Doing something about it, however, is very difficult, because you have to test multiple lenses to even find out if there is variation, how much, and how good they can get and which one is the good one! How can most people do that? That's where an angelic dealer can be a lifesaver. And other photographers who share sample images or have experience, coupled with the care and experience necessary to evaluate a lens well — it's all about the corners — if the corners are sharp wide open on the plane of focus, when the center is sharp, you've got a good one (barring heretofore unseen major complications of another sort, such as severe local blurring in a region in between two corners). The corners of a 2.8 lens will still likely not look great wide open, having a smeary, low-contrast look, but they'll be in focus, so that the lens becomes usable for fine work by stopping down about one stop, instead of having to stop down two or three or four stops to get a flat field into focus all over (as needed for a common, infinity focus subject, aerial photography, copy work, some architecture, etc.).
Be that as it may, here is how I would immediately test a new medium-format SLR camera with a digital back, as soon as I got it, on the presumption that it might need to be returned. And no, the lens has nothing to do with focus calibration, except inasmuch as setting a given distance on the barrel might not get you that distance. The lens has other problems to look for (mainly bad corners due to curvature of field, where the plane of focus isn't a plane).
To test whether the combination of the camera and back are well-calibrated for overall focus, you need to test both the AF and the Manual Focus. For testing the MF, you really need to use a supplementary magnifier as described above.
And to test the AF, you first need to learn how the AF works. Where exactly is the sensitive AF area? And what kind of image detail being present in that area will give a good result with a lens of a given speed? I've explained the answers to those questions for the AFD III/Phase One body above. If you own a Hasselblad body, you'll have to figure that out for yourself.
Next, you need to find some good subject matter for making exposures. One of the best is a tall fence at an angle of about 30 to 45 degrees off from the optical axis. If you focus on a particular vertical board in the fence (one that you can recognize later in the image) at a distance of, say, 40 feet, you can find the center of the range of in-focus boards in the resulting file and see if it matches the board you focussed on. Most importantly, you need to first test by shooting with the lens wide open! Your lens may have focus shift, which causes the plane of focus to shift merely on account of stopping down the lens, but to start off with, just forget about that. Test for it later by stopping down two stops or so. If you stop down 3 or 4 stops, the depth of field will become so large that you can no longer detect the focus shift, if there is one.
If you are using a 100 to 110 mm lens, for example, and you focus on a board that is 40 feet away, and the resulting image is in focus (as you view it either on the back of the camera after zooming in all the way or on your computer's display) within one foot (i.e. 39 to 41 feet), then your camera and back are good. If you focus at 40 feet and the picture is in focus at 32 feet, you've got trouble (and that starts with T, etc.).
When you do this test with manual focus, you will probably find, depending on the magnification and care that you use, that the results of your efforts vary a lot, so make a dozen careful attempts and average the resulting distance to eliminate the random variation in your manual focussing. AF will be more consistent than the magnified MF method, especially when the AF has a good, contrast edge in a favorable orientation to focus on, but the MF method can sometimes save you from weak AF too and overall I find that the extra magnification makes MF equal on balance to AF, but a little slower. Plus with the magnified MF, you can get the certainty of being at least very close, albeit perhaps with a little practice required.
If you find that your manual focus, especially if you have one of the recommended magnifiers, is definitely off, but your AF is right on the button, then I think you are very likely to have a body with a bad focussing screen position, and a good back. A dichotomy between the AF and MF results can answer that otherwise most-difficult-to-answer question: which is bad, the body or the back? It's possible that the AF in the body would be out, but the MF would be correct. In that case, things could be the other way around, so that accurate MF might strongly suggest the back was good, even if AF were out, but I haven't seen that yet, in my small sample of three bodies plus one other which I tested carefully. At least an initial guess can help you more quickly find the right experiment to prove what's wrong beyond a reasonable doubt.
If both are bad, and in the same way (Manual Focus and AF both focus at say, 35 feet when you focus at 40 feet), and you are using a Mamiya/Phase One body, I would guess that you have a bad back. But the best way to verify that is to have a friend or a dealer with a duplicate setup that is working just right, so that you can set up a test shot on a tripod with the good system, shoot a frame that proves to be in perfect focus when you zoom in on the LCD on the good back, then, without touching the lens (!) so as to not disturb the focus, remove the good back, put your suspect back onto the camera, and re-shoot. If the result is again perfect, your back is good. If not, the two backs differ, and the obvious probability is that your suspect back is the problematic one. If it's far enough off that you are now sure that it's off, it's focus calibration is bad enough that it does not meet a proper spec, such as Phase One's 12 micron spec. It's probably at least 20 to 30 microns out and could be many times that.
If you should want to calculate for yourself how many microns out it is, you will have to measure the amount of lens displacement necessary to move from the actual focussing distance to the intended focussing distance. You can measure how far your lens's focussing ring moves through its full range of travel. Then you can measure the circumference of that full range of lens rotation, and the distance you need to rotate the lens to make the adjustment. Divide the small lens rotation by the larger lens rotation and multiply that fraction times the full in-out travel distance of the lens ring. That can tell you, within, say 10%, how far the lens ring moves (and therefore, at least with some lens designs) how far some or all of the elements of the lens are moving in order to make up for the focus error of the sensor. This would not work with internal focussing optics and could be quite a bit off with optics where only some of the elements move. It is straightforward with simple lenses that move in and out for focus, like view camera lenses and many others. You can also examine photographs of the helical mounts of digital lenses and by a tricky process figure out how much your sensor would need to be off, in order to shift the focus in given way with a given focal length. Or find the formula for the same. Of course, view cameras (with bellows) don't have this problem in the first place of course. (They have only the potential for the ground glass surface to not match the plane of the sensor surface. And they have a lot of other disadvantages as well, including speed of operation, size, etc. Tradeoffs, tradeoffs!)
If your test subject only has one camera-to-subject distance represented near the center of your image, and the plane of focus falls ahead or behind the subject, you may have no way to tell where the plane of focus is in the resulting image. If you had live preview on the camera (the way many small-format DSLRs now do), you can focus through the sensor live. If you are using a Phase One Plus back, you can also attach the camera to a laptop or desktop machine via FireWire and use the live preview focussing in Capture One to verify the plane of focus with great precision. That live preview updates 5 frames per second, I am told. I have never used it, but I've seen one brief demonstration. This could be a very direct and quick way to see what's what, as opposed to shooting frames and trying to see in the results where the plane of focus is. Choosing good subject matter for testing, which makes it easy to see where the plane of focus is when it's off, is a very good idea.
But do check your focus! And do be aware that the back can see way finer detail than you can see through the viewfinder without supplementary magnification, so don't expect that unmagnified manual focussing can be as accurate as it seems to be when you're looking through the viewfinder.
Live preview would be very handy for watching focus shift upon stopping down too. I have yet to observe focus shift in any lens I've ever owned, though there could be a little of it here and there. If I have had lenses that misbehave in this way, whatever it's been doing must have been overwhelmed by the increasing DOF from stopping down. Mark Dubovoy has observed focus shift equal to "two smidges" when stopping his 100 HR lens down from f/4 to f/8. Bill Atkinson has figured out a super-precise method for detecting focus shift and/or focus errors which I am not remembering the details of at the moment, but you may be able to find it written up somewhere on the web. Also, there is a new gadget on the market called LensAlign which was reviewed here on Luminous-Landscape for checking the accuracy of a camera's AF system, some of which have now begun to be user-adjustable, even on a lens-by-lens basis (Canon, Nikon). I've never noticed any of my Canon cameras exhibit inaccurate AF or MF, which is not to say they are perfect, but they must be close. They may or may not have observable inaccuracies, but I've never seen problems in this area close to anything like I've seen with the medium format systems. And I have heard of Hasselblad AF not being accurate, in the testing of a friend, but I can't say anything more about that. I suspect their AF also tends to work well most of the time. I believe that has been the experience of my friend Bill, and probably a ton of other people too.
Still, for many reasons, I prefer the Phase One outfit, as nice as the Hasselblad system is. Compactness is one big reason. Or is that a small reason? :-) Openness is another. Environmental toughness is another reason to like the Plus series of backs (check out the little movies where they freeze, bake, drop and try to crush the backs).
If your body or back are out of focus, unless it's by an amount that you don't care about, you should complain, and you should let other photographers know, so they can't tell each of us individually that we're the only one. They should be dead-on (within maybe one inch at eight feet or about one foot at forty feet — something like that).
Now on to topic #3: Testing the Lenses.
First some background: When you shoot as though you were doing copy work, if everything is right, the lens will focus almost perfectly on the flat plane and the image will be very nearly equally sharp all over, despite the inevitable falloff in lens performance off axis. With a good lens, that falloff in MTF is generally too small to see, except perhaps as a loss of fine detail contrast, i.e. apparent texture, even with a digital sensor. It's true that different lenses are optimized for different reproduction ratios (distances) and that the flatness of a given lens (its freedom from curvature of field, where the plane of focus isn't a plane) varies by distance, but that's not all that much of an issue, compared with the issues I'm getting at here. The corners should still look in focus, for a non-macro lens at least, at intermediate and long distances, on a flat plane perpendicular to the lens axis (absent a tilt) when the center is in focus. The distance from the camera to the center of that plane is less than the distance to the corners of the area being imaged, of course. So if you focus on an object in the middle of the image which is not at infinity, then re-aim the camera so that that object is now in a corner, the plane of focus will fall behind that object. Be sure you understand that. If the object is effectively at optical infinity, then re-aiming the camera has no optical effect — objects moved from the center to the corners should still be in perfect focus.
But using the top of a power pole as a test subject is a great way to test lenses, because most of us have one handy to work with, it's reasonably far away, it's very contrasty, and we usually don't have a giant, high-contrast far-away subject to work with (e.g. an urban view from the top of a tall building, or a close-in, steep, mountain ridge, or whatever). So one might ask, how far behind the object will the plane of focus be, if we put that object into the corner of the image? We can figure that out with a little trigonometry. If your power pole's top is 150 feet away, and you are testing with a 100 mm lens, and you are positioning the pole top about 7/8 of the way to the very corner, the focus will only shift a few feet. I will re-do the trig now just to be sure. The angle of view from near one corner to the center would be about 15 degrees. The distance would be about 155 feet, or five feet of shift. So if we see the focus shift a very tiny amount behind the pole (that amount would be barely perceptible if at all) we would welcome that shift. At 200 feet, the focus would shift by 6 feet 8 inches, an even less perceptible amount of shift at that distance. So if you've got a power pole to use, go for it. Just stand back 50 to 70 yards.
The problems you are likely to see with flatness of field in the corners of lenses are much greater than such a small shift. So the power pole test works. You can also position yourself so that the wires approaching and leaving the pole are at an angle of perhaps 30 degrees to your optical axis, and the appearance of the wires, so long as they are positioned pretty close to the corner of the image, can reveal where the plane of focus is, when the top of the pole is clearly not as sharp as it was when it was in the center of your image.
Again, this test should be done wide open. When a lens is of fine quality, the corners won't look as good as the center, but they should not appear out of focus. Although there are many aberrations which affect lens performance (astigmatism, coma, chromatic aberration, spherical aberration, distortion, curvature of field, diffraction, and perhaps more), I have found that by far the biggest problem with lenses not being up to spec comes from curvature of field. These days, chromatic aberration and distortion would be the next two of greatest significance. Diffraction from the use of small apertures is independent of the lens design and not something that you'll see happening with a wide-open lens. With lenses for film use, the diffraction was obscured by the inherent blurriness of the film until you had stopped down to roughly f/16 or f/22 or more, typically, but now you can actually see diffraction starting at f/8 or f/11 in captured images, by seeing degradation on the plane of focus, at the center of the image, compared to f/4 or f/5.6 — but watch out for the possibility of focus shift, which could produce a similar effect upon stopping down the first couple of stops.
So: Using a lens that falls into the 100 to 120 mm range with a medium-format back (i.e. 1.67X to 2X the sensor diagonal), point your camera at the top of a power pole 150 to 200 feet away, using a tripod. Use Manual exposure, and set the aperture to wide open. Focus very carefully on the pole, either using AF or manual focus with a monocular or 2X focussing magnifier. Use mirror lockup and wait six seconds to trip the shutter after lockup (or longer if your tripod isn't bomb-proof). Use a good cable release or electronic shutter release. Examine the image on the LCD of the back, by zooming in to 100%. Use a Hoodman Loupe or similar to see the LCD well if necessary. If it doesn't look entirely sharp, your focus was off. Refocus and repeat until you see a sharp image in the middle.
Do not touch the lens! Re-aim the camera to put the power pole in the top left corner, as close as you can to the corner and still see what you need to see. Re-shoot, and again zoom in on the back to see if the pole is in good focus. Re-aim the camera to put the pole's top into each corner in turn, shoot and examine. If all four corners look good and the lens is a fixed-focus lens, you're done. If it's a zoom lens, move on to other focal lengths and repeat the process. I use the widest, longest and the middle focal lengths when testing a zoom (3 total). Expect to see trouble at the widest end, at least if you're testing a Mamiya 75 - 150. If you're in a hurry, test it there first. If it's good at 75, you're probably in luck, but finish the test anyway.
You may see some apparent differences in the appearance of the power pole from one corner to another because of the non-radially symmetrical nature of the power pole and its wires, cross pieces, etc. Since the MTF of a lens can vary a lot from the radial direction to the tangential direction, diagonal lines in the image can look much sharper if placed in one corner than another, even if the lens is perfectly symmetrical. Don't be fooled by that. I like to read the little HIGH VOLTAGE sign, as a more uniform way to evaluate each corner. Of course, you can also move the five captures for each focal length onto a computer and examine them more closely.
Beyond this corner focus test, a simple exposure of a flat wall can make sure there are no noticeable anomalies that might cause blurry regions away from the corners. Just make sure your optical axis is perpendicular to the wall, and the wall has clear texture all over.
When a lens is suffering from curvature of field, the corners generally can be sharp, but not at the desired distance, so the corners in your image tend to be out of focus when they should be in focus. So far, every case I've ever seen of curvature of field in a lens has brought the plane of focus curving closer to the camera near the corners, never further away. The curvature can begin at or near the center of the field or only near the corners or even beyond the corners, where you can only see it in a shifting situation, as when using the rising front on a view camera. One 35 mm Apo-Sironar HR which I helped to test last year, when in focus at about 120 or more feet in the center was in focus at about 30 feet in the corners, and it wasn't the worst lens I've seen.
In my limited testing of Mamiya lenses, I have looked at seven 80 mm lenses and three of the 75 - 150 zooms. The first of the zooms I tested was Charlie Cramer's, which he kindly lent me for this purpose, and with which he had always been happy. I hadn't yet figured out the optimal test methods for tests carried out at home, so my tests of that lens were incomplete, but I did notice a little problem with one of the two corners I looked at, with the lens set to 75 mm, wide open. I never did test the other two corners at 75 mm. This was a small enough issue that he had never noticed it and I wasn't very surprised that he hadn't. If you never shoot wider than f/11, you'd have little chance of seeing this particular issue. So I ordered a lens for myself. That second 75 -150 was another matter entirely. At the 75 mm setting (apparently the most problematic focal length for this design), two of the four corners were extremely bad, and two were nearly good. Focussing at 8 feet away, the lower right corner of a horizontal image resulted in the plane of focus being about 6 feet way. This is more than 20X the acceptable curvature of field, and was grossly asymmetrical to boot (the four corners did not all behave the same way). I could hardly believe how bad this lens was, especially after having seen a number of glowing reviews online. I returned it. I found another, locally, and was given the chance to test it by my dealer. It was flawless. All four corners were in perfect focus when the center was in focus, at 75 mm, at 110 mm and at 150 mm.
My goal is to get lenses which enable me to shoot at 5.6 and 8 when there is a desperate need for speed and still achieve superb image detail from corner to corner. I won't do it very often, but having the ability can be crucial for certain kids of images. The first 75 - 150 I purchased (the bad one), was serial number GE1048. I hope it has been returned to the factory for repair, or that M.A.C. can repair it. It should never have gotten out of the factory in the first place. Now that Phase One has a controlling interest in Mamiya, it falls to them to insure that the QC improves. Surely if Mamiya can build lenses like the 75 - 150 that I wound up with, they can do it consistently. They sure as heck aren't doing it now. (If you read my giant article posted April 5, 2009 about issues with medium format, you will see that Schneider and Linos/Rodenstock haven't been immune to serious QC issues either, which leads me to assume that all lenses for digital work had better be assumed defective until individually proven otherwise.)
My next adventure was the process of shopping for a new 80D lens. I chanced to see a picture made with one of these lenses by a friend, hand-held, of all things, at f/8, of a subject which was great for testing lenses. The result was one of the best examples of good optical performance I have ever seen. It was stunning. The corners on the plane of focus were perfect (shown below, first unsharpened, then sharpened). Clearly, this lens would still be superb at f/5.6. So I thought, if these 80D lenses are this good, I should get one and figure on using it in place of the zooms when I can (that was before I found out how good the 75 - 150 could be). So when I bought the Phase One body, I ordered it with the 80D kit lens. Sadly, the lens that came with the camera was nowhere near the quality of the one that had been used to make that picture. The body was also bad, being out of focus calibration, as previously mentioned. I got to swap that outfit for a different one. The new Phase One body had perfect focus calibration, but its 80D lens was also woefully inferior to the one which made me want to own one in the first place.
Fortunately, my dealer then allowed me to come over and put all four of the 80 mm Mamiya lenses which they had in stock onto my camera and test them. Three were 80Ds, and one was one of the older 80 AF's. Only one was good, and it still didn't strike me as quite as good as that one I had seen, but I was happy to have it and I have since decided that if I ever do use it, I would be willing to dare to use it at f/5.6, subject permitting, assuming I verify that the focus is set just right (the best way to really know can be to examine an exposure at 100% on the back). Two good ones out of seven does not strike me as acceptable quality control. Perhaps you too should let them know what kind of QC you would prefer, although I can see how it might be difficult to speak up unless you have proof that what you've purchased is not what it ought to be. Therein lies the rub.
Usually, we buy a lens and not only have nothing to compare it to (i.e. we only bought one of the things, obviously, so we don't know, beyond a few verbal characterizations by other photographers exactly what to expect), but we usually don't do systematic tests aimed at revealing the most likely weakness of the thing, i.e. softness in the corners, and do those tests right away. So if we notice a problem in an image that matters, later on, it's too late! We're hosed. Then what do you do, sell it? But things have changed. Now, we must test every lens we get, every body, every back, and do so immediately, so we can return them. The sensors are so sharp that the lens makers' QC hasn't kept up. This puts us in a very bad position. People don't buy $50,000 camera outfits to get blurry corners. We can manage that for a far less painful price. At least if we know that we need to test everything, and if we know how, then we can protect ourselves from getting burned. Nobody messes with my pictures...
Here are three sections at 100% magnification, unsharpened, from different parts of the field of the bad 75 - 150 at 75 mm focal length and f/4.5 (wide open). The church is 450 feet away. First the center. Then the top left corner, which isn't bad for a wide-open corner. Then finally the lower right corner. Wow. This lens was actually shipped as salable merchandise, and the retail price is over $3,800.
Center:
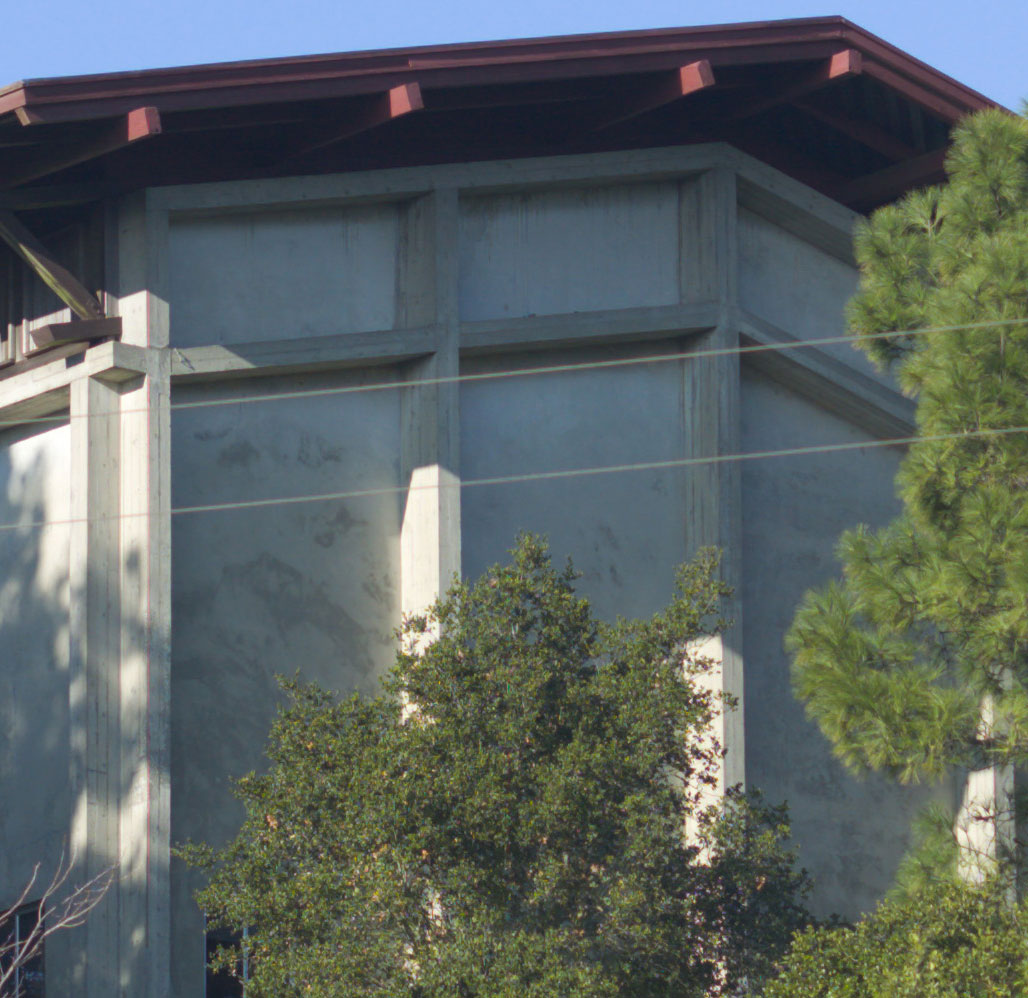
Upper Left Corner:
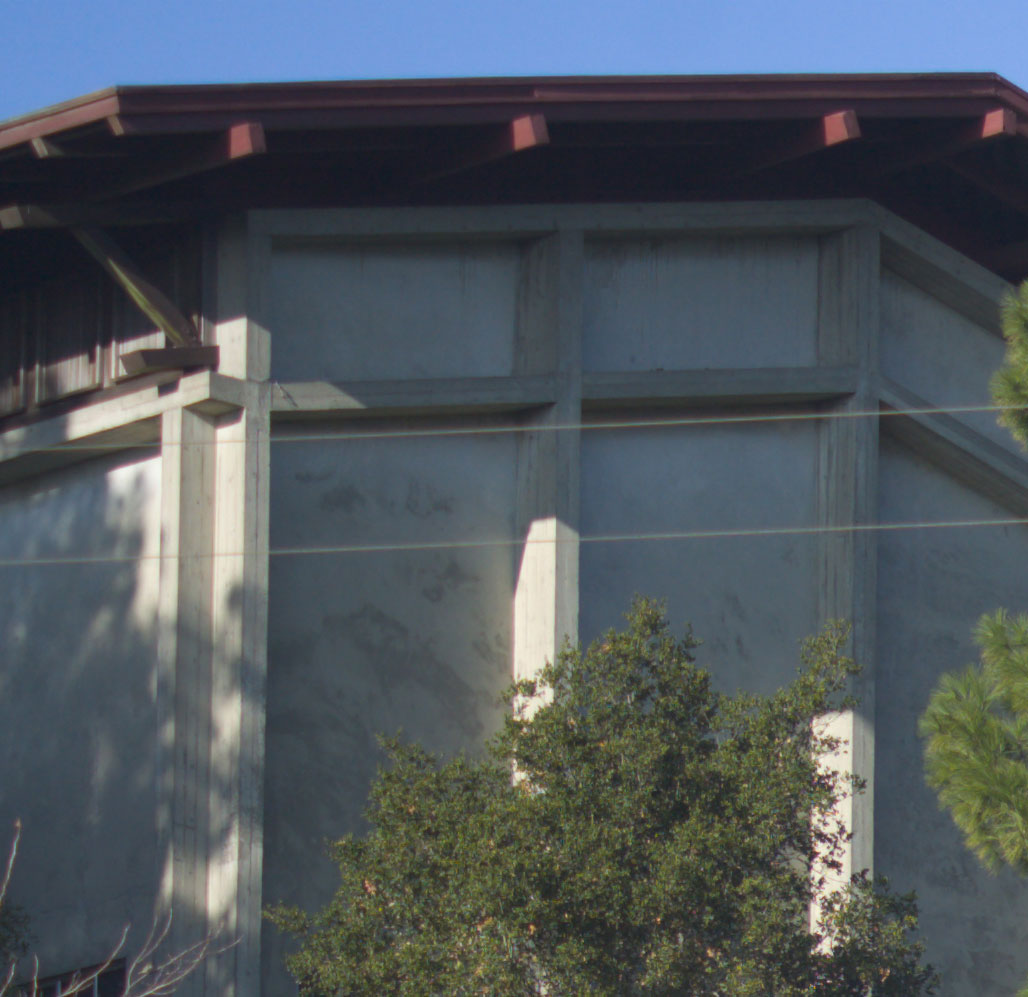
Lower Right Corner:
Now, for comparison, here are two sections from the wonderful shot from that first 80D that was so good. It was auto focussed and shot hand held at 1/160th at f/8 and ISO 100. I will first show you a section from the center, where the closer portions of the subject are in focus, then a section from the lower left corner, where the same plane from the center is still stunningly well revealed. This result shows that this particular lens would be also stunning at f/5.6, and will also be at least in focus in the corners wide open at f/2.8 — and that's all four of them, since the other three corners of this image are also excellent at f/8.
Center at 100%, no sharpening, no noise reduction, "high quality" JPEG from Save for Web option in Photoshop:

And here is the lower left corner (find a sharpened version of this section near the end of the article):

This result has the solid feeling that one wants, in order to achieve a decidedly large-format look in the 4x5 to 8x10 range. A good 75-150 stopped down to f/8 can do the same. With careful processing, including optimal sharpening, this file can look just incredible in a very large print. Lenses that deliver highly variable center-to-corner quality cannot (when the subject matter demands consistent detail from corner to corner).
And one last comparison for you, the center to corner of the first 80D I received (call it 80D #2) when I purchased the Phase One body (which body was out of focus calibration as mentioned in section #2 above, and therefore subsequently returned). This pair of exposures, with the camera re-aimed and not re-focussed between shots, were also at f/8, like the last one, to get apples and apples. The church is 450 feet away (I have a laser rangefinder). Mind you, when I received the camera and lens, I was fully expecting to see corners at f/8 that were as good as what you see in the last JPEG, above - i.e. superb. I had no idea I was about to discover that the great majority of these lenses are arguably defective (again, 5 of 7 were bad).
Center, f/8, unsharpened, at 100%, "high quality" JPEG. Good quality like this in the center of lenses is basically universal in my experience.

Lower left corner, same lens, camera re-aimed to position the subject in the corner, focus unchanged, f/8, again unsharpened during the raw processing, at 100%, "high quality" JPEG:

If you've stopped a lens down three stops and the corners on the plane of focus are not yet sharp, as this one is not, you're basically out of luck for making sharp corners with that lens. Naturally, it was worse at 5.6. Would you accept a lens like this? A lens like this will serve merely to ruin nearly every picture I could make with it. Yet, I had to examine five additional lenses of this new 80D type or the older 80AF type, in order to find just one that was almost as good as the one used to make the first 80D center/corner image pair above. I am baffled as to why this level of quality control is considered adequate by the people responsible for QC at Mamiya (now, that's Phase One, so perhaps we'll see an improvement as the demands of digital capture sink in a little more deeply?). What do you think about this quality? It's only maybe 1/4 or 1/6th as bad as the bad 75 - 150 zoom was, taking the smaller aperture into consideration, but for me it's still a paper weight (unless one's pictures don't need sharp corners).
So what are we the customers and the makers going to do about this? I've only tested 7 of one type of lens and 3 of another type, plus singles of a few others (55 - 110 AF zoom, which is so-so, i.e. OK but not great if you only use it at f/11 and smaller, 105 - 210 manual which is excellent and definitely usable at f/8, if not even f/5.6 in a pinch, at all focal lengths, a 35 AF, which was decent but not great, a 45 AF, which was fairly good, and a 55 AF, which is likewise fairly good but not for use at 5.6. Like other prospective owners of this system, I've read lots of comments in discussion forums, which have helped me to know what I might think about a lens from Mamiya (as well as from other makers).
But one thing that has struck me about what people write is that they all seem to believe that if you use one of these lenses, that this means you know what that type of lens is like. Unfortunately, the quality varies so much from lens to lens, that the variability between individual samples is larger than the variation between the lens designs themselves in many cases! And this isn't just true, in my moderately limited sampling experience, of the Mamiya lenses, rather, to my great surprise also of the wide-angle Schneider Apo-Digitars and the Rodenstock wide-angle HR's (not counting the new 23 and I expect not the new 40 and 50, but we'll see). When I started my shopping research into M.F. systems over two years ago, I was still under the impression that the MTF specs for a lens were highly revealing, as they had always been in my experience with view camera lenses. I spent ages acquiring and studying all of the data sheets for the German digital lenses. But now I see that, sadly, the manufacturing variability is, at least in many instances, a larger factor than the actual specifications!
I actually was hesitant to let people know what I have discovered, because this will clearly make it more difficult to find good copies of any given lens as we all compete to find the good ones. I also don't want to hurt the companies that make my favorite equipment — I really appreciate and depend on the good work that they do — but if a public discussion of the issue is required to get their attention, so be it. I tried to avoid this. The only hope is for the lens makers to get a lot more serious about the consistency of what they do.
Finally, item #4, some tips on processing for sharpness and some sharp examples.
Here is the same lower left corner of the shot from the best of the 80D's, but this time, sharpened to taste in RAW Developer (Mac only, www.iridientdigital.com) and with some chroma added using my chroma variant system (see http://www.josephholmes.com/profiles). Again, this was shot at f/8, with a P45+ on a Phase One body with the new 80D lens, hand-held, 1/160th, ISO 100, and it's a prime example of the corners looking as good as the center. It was converted to sRGB, chopped down to 8 bits per channel, and saved as a "very high quality" JPEG in Photoshop's Save for Web.
I offer it just to help you get an idea of how good interpolated digital capture from a back can be when the lens and the processing are good. We can quibble until the end of time as to exactly which amount of sharpening is OK, but this is, again, the file at 100%. Commonly, a digital capture can only look this good at 50% or below. A few aliasing artifacts could be avoided if the capture did not require interpolation, but this is nevertheless a large amount of information at a gorgeous quality level, considering it's less than 1/23rd of the full frame. The trick is to get into this ballpark routinely.

Until I recently learned just how good the interpolation plus the R-L Deconvolution sharpening in Brian Griffith's RAW Developer application can be, when I needed to get a dose of perfect digital data to remind myself of what I was working toward, I had to take a quick trip to Mike Collette's web site, http://www.betterlight.com/fullRes_zoomifyLIST.html, to ogle the pictures there, usually the Half Dome image. I still go back to those images, which arguably show perfection of detail (subject motion and light levels permitting), to compare the new results I'm seeing from my outfit and to get a breath of fresh air and remind myself that at least with certain arrangements of matter, that pictures can look as good as what I see with my own eyes.
I have another sharpened sample image, which is one frame of a pano of Crater Lake, with the full frame available for download (21 MB JPEG), at the very end of this article: http://www.josephholmes.com/news/2009/4/5/medium-format-digital-camera-optical-precision. Read the description of that image in the article to get a sense of its optical weaknesses, etc. The overarching lesson about trying to achieve this level of quality is that the elements of the system (chip plane calibration, focussing screen calibration, lenses' freedom from curvature of field, etc., magnification for manual focus, interpolation, sharpening, and more) all have to be optimal, and the hardware must be built to tolerances that are incredibly tiny. Individual E. coli bacteria, if sharply imaged in contact with one of these sensors, would be plainly visible. The mechanical and optical components are having a hard time keeping up with the sensors. Purchasing components from multiple vendors seems to inevitably lead to integration problems and problems with accepting responsibility for screw ups. But open systems are great, and it's also great that Phase One and Mamiya have joined together to strengthen their products and that they remain committed to openness in their products. I don't expect integration on par with Canon or Nikon, but I do expect, and I think we all deserve QC which equals or exceeds theirs. When you pay several times more for a sharper camera, it has to be sharper. No if's and's or but's.
Since all the more common types of non-scanning back sensors use a Bayer filter array (each pixel has a red, green or blue filter over it), building the image requires that the missing color channel data be filled in from the values which are present. There are many ways to do this, and some work better than others. The interpolation that's in RAW Developer and that in Capture One Pro are both first rate. Unless Adobe has managed to improve theirs recently (as it seemed that surely they would when they acquired Pixmantec and the excellent RAW Shooter interpolation over two years ago), theirs is no match for the other two. Fine detail is lost.
Here http://www.josephholmes.com/news/mf/Golden_Gate_Comparisons.jpg (1.4 MB JPEG) is a comparison of two 100% renderings from Capture One with a third from Camera RAW, with settings as indicated on the image. I attribute the difference in detail between the 2nd and 3rd image of the Golden Gate Bridge to the differences of Bayer interpolation quality used by the applications. The Mamiya capture is with the 75 - 150 zoom set to 75 mm and f/8. The bridge is about 13 miles distant. To the right is a small section of the equivalent region (near the middle of the right edge of a horizontal frame) from the capture which got me started with understanding what one could, at least sometimes, get out of medium-format digital capture. It was made with a 35 mm Apo-Digitar, and Hasselblad 39 MP back on an ALPA 12 SWA, with the lens set to the infinity stop and f/11. You can download that entire image here: http://www.callme.com/lens_tests/35_A-D_f11_Inf_Exc_Hass39.jpg (10.4 MB JPEG). It's one of the many, full-res files available for download from my previously mentioned article.
In case you are using fixed lenses with depth of field marks on the lens, and you're not familiar with these systems, most of them use a circle of confusion diameter which is two to three times larger than they should be using to calculate the positions of the marks. Therefore, if the lens barrel says you have enough depth of field at f/8 to get from 10 feet to infinity, you'll probably be about right using f/16 to f/22 instead. Some view camera operators have never had to learn this lesson before, so I mention it just in case.
Those are the core issues for this topic. Of course one still has to think of things like how long one needs to wait after locking up the mirror before tripping the shutter (5 or 6 seconds may prove to be safe and 2 to 3 seconds may or may not, depending). Using a center column may hurt you, at least part of the time. And sometimes, if you need a lot of depth of field, it may work better to combine two or three frames shot at moderate apertures, rather than one at a very small aperture, using the newest versions of Helicon Focus (see: http://www.josephholmes.com/news/2009/3/31/focus-blending-takes-quantum-leap-new-helicon-focus-versions). And you need to know how to balance off higher ISOs for less subject or camera movement with your particular back against shadow noise. And which noise suppression techniques to use and when (I like RAW Developer's Color Smoothing function at about half strength for controlling one kind of interpolation error which can crop up around contrasty edges, e.g. twigs, but none of his other noise reduction methods, and I like both Noise Ninja and Neat Image for removing noise, used as Photoshop plug-ins). And of course, I love my chroma variant profiles for controlling the amount of color! (Nothing to do with image detail, but it's a good time for a shameless plug anyway.)
—Joseph Holmes
Addendum, April 24, 2009
Two New Lens Experiences
While endeavoring to round out my lens outfit for the Phase One body, I have undertaken to acquire fixed focal lengths at 55 and 45 mm.
I have 55 mm covered already, with the 55-110, but the performance of that zoom is not great, and I would like this particular focal length to do better because it's one I have used quite often in my early work with this Phase One/Mamiya system. Unfortunately, Phase One has apparently decided that Mamiya, which they now control, should renege on their promise last year of delivering a high-quality 45-90 zoom, a promise which is part of what I relied upon in deciding to purchase the camera system. From what I was told, they have moved other new lenses ahead in priority, but it remains unclear whether the new zoom will ever be built, whether it will appear in 2010, or what. In any case, it does appear that it will not be arriving in 2009.
The 45 will become my shortest lens, and when I use it with stitching, it will extend the effective focal length of the image down to 35 mm, which is about as wide as I ever want to go.
My hope has been to find lenses that are beautifully sharp all over at the largest aperture I can get. The world's best lenses for medium format digital uses are actually optimal at f/5.6, or at least they are when they match their calculated MTF. One of the lenses I'm thinking of is the Rodenstock 35 HR, a super-wide lens no less (it's much harder for a superwide to be sharp all the way to the corners, even without shifts, than for a normal to medium-long lens to do so). As explained in detail in my earlier medium-format article published April 5, 2009, my limited sample of 35 HR lenses has yielded surprisingly poor results, compared to the MTF data for them. Perhaps the new lineup of wide lenses from Linos/Rodenstock will prove to be much more consistently superb. Early indications for the 23, based on the performance of a single lens and comments on the results from other lenses, are very positive.
So, I tend to think that the optimal outcome in a hunt for a lens is very, very good performance at 5.6, when the focus is perfect (not so easy to do at such a big aperture, but feasible with a good effort and a subject which allows it, such as one with nothing closer than 30 to 200 yards or more, depending on the focal length). Such a lens would be basically flawless at f/8 and above, with gradually increasing diffraction, which can be sharpened away very successfully up to nearly f/22 with the right tools, but which at f/32 destroys much fine detail entirely.
I also have come to think of lens grades as being the question of the aperture at which they become what I would call usable, and the aperture at which I would call them superb, where you simply don't see the lens intruding into the image at all. When lenses are good, they have a way of making it seem easy for lenses to be good!
Some of the lenses I've seen would not pass muster even at f/32, however, most of the bad ones become usable at f/16 and above or at f/22 and above. Depending on the design, some rejects become usable at f/11 and above.
The Mamiya 55 mm f/2.8 AF lens, which I purchased used, at first did not impress me all that much, because I was looking at it from the perspective of performance at 5.6 and 8. However after testing a manual focus f/2.8 45 mm N lens, and finding is much worse, I went back for another two rounds of testing and decided that with only one corner of the 55 being noticeably weak at f/8, and that corner luckily being the top right with the camera in horizontal position, that this 55 was actually excellent. When the camera is in either vertical or horizontal position, the weak corner is always at the top, and thus more likely to be filled with subject matter that will not reveal a problem (e.g. sky). Besides, the 55 is incredible at f/11 and up. So chalk up one success out of one lens tried. The sample is too small to tell, but one success out of one is a much better sign than one failure out of one. Also, other photographers' comments on this lens have been quite complementary. Oh — I almost forgot. There was one other 55 AF, which a friend tested and showed me the results: it was a good one also. Although I did not see a test shot which revealed the performance of all four corners, the behavior in two of the four corners and throughout most of the rest of the frame was superb at f/8. So without knowing about the two top corners at f/8 with that lens, I'll go out on a limb and call that two for two — an even better sign for this design.
Now to the 45 manual focus N lens. The Mamiya N manual lenses are the most recent of the older MF types. The S lenses have a different barrel design and are older, but still have relatively good coatings and may be optically indistinguishable from the N models — I don't know. The next older class of manual focus lenses is the one often referred to as "77", at least in the 45 mm focal length. These share the barrel design of the S, but have inferior coatings, which will result in lower contrast/higher flare. I should mention that the manual focus Mamiya designs have a strong appeal when one is not relying mainly on auto focus, because they allow for much, much higher precision while utilizing the distance scale and DOF markings on the lens barrel. The short throws needed by the AF motors in lenses require a tradeoff of lower manual focussing versatility and precision. Since I have learned how to get very accurate manual focus, as explained above, and because I employ a number of more complex focussing strategies, I can benefit quite a bit from the older barrel designs of many of the Mamiya manual-focus types. Another benefit is that their cost tends to be very low. But these designs lack all automation: no automatic stop-down, no recording of the focal length or aperture in the EXIF data of the image file, and stop-down metering requires the use of the special "Focussing Screen Type C", which I do not use because the first one I purchased was grossly defective and ruined the focus accuracy of the camera completely and I have not revisited that topic. So arriving at the ideal exposure takes longer.
Here is how I start off testing a lens: focus very carefully on a contrasty object such as the top of a power pole at roughly 70 yards or more distance, with the object at the center of the frame (on axis). Verify with an exposure that the focus is very close to perfect. Knowing how to recognize this is one of the skills one must learn for using a digital back. Zoom in to 100% on the back and make the determination with a low-power loupe. Then re-aim the camera so that this distant object is in each of the four corners in turn, exposing one frame for each corner, with all due care to get a vibration-free result (cable or electronic shutter release, mirror lockup, no wind on the camera, keeping your feet still, no cars driving by to shake the ground, and six seconds to allow all vibration from the mirror lockup to fade away). Make this set of four exposures both wide open and at 5.6. Depending on how things go, you will probably also want to make a set of five exposures for each of f/8 and f/11, and if things go really poorly, you'll need to try f/16 and even f/22, but it's also a good idea to see how your lens behaves at each aperture, and if you will own this lens, to memorize it.
For a more thorough exploration of the results, copy the files to your computer and examine them for an hour or two in the raw processor of your choosing. Or check them over once, then go back to them a few times, after looking at results from other lenses, and to look for things which you didn't notice the first time around such as color fringing (chromatic aberration) on contrasty edges near the edges of the frame, or strongly differing saggital vs. tangential resolution, distortion, etc.
If a lens passes the corner tests at an aperture which is sufficiently large for your hopes or demands, say f/8, then also make images at f/8 of a revealing subject which will either fill the frame on the plane of focus with a single exposure, or with a series of exposures which place good subject matter in each region of the lens and then inspect the entire field of view — just in case.
Back to that 45: at first I was happy to see that each corner was sharp at 5.6. With the prior designs I have examined, that has always meant success, but not this time. This lens showed a ring-shaped (doughnut-shaped) band, between about 75% and 90% of the radius of the lens (from axis to corner), i.e. just inside the corners, where the image detail was severely degraded, as though there had been strong camera or subject movement (there had not). I am guessing that this is spherical aberration. So the question became, how far down would I need to stop the lens before I could no longer see this junk imposing itself upon the image? The answer was that it was still quite evident at f/11 and even subtly visible at f/16. So this lens had to go back. Although I probably use f/14 or f/16 more often than any other aperture, I very much want to be able to shoot at f/8 in a pinch, for speed, and to know that the results will be compromised only a very little bit, at most. If I were to attempt a night photograph with this lens, the image would be ruined. If I were to attempt to photograph the ocean at f/11 or f/8 as is frequently needed to prevent excessive motion, the images would be ruined. So now I have to try another.
So far, I've also seen samples of two other Mamiya 45's: one an AF and one a D. Neither of those was good in all four corners at f/11, but both were pretty close, each having two weak corners (but not the same two corners). Both were good at f/16. They did not show the poor-quality ring-shaped region further into the image, which the manual focus lens did, but I do not assume that this is due to a difference in the optical design. The basic formula at least remains 9/8. After I have a chance to examine a couple more 45 N's, I will probably have a good idea whether that is true or not. I will let you know in a couple of weeks. So the newer 45's were better, but neither was actually trustworthy for landscape work, sans stitching, at f/11, despite having superb image detail everywhere else in the frame. What at shame! The distortion of all three types that I have examined (N, AF, and D) was the same = substantial barrel distortion, more than average for a fixed focal length of this coverage angle, but I will have faith that this will not present much of a problem due to superior distortion correction tools which are slowly emerging (the interpolation used by such tools should be of superlative quality so that the act of fixing the distortion doesn't degrade the image detail noticeably).
When you are stitching (with the camera re-aiming method), bad corners tend to become irrelevant due to overlapping frames. Also, when you are stitching this way, distortion is irrelevant too, as it will automatically be removed and with no additional hit of interpolation. If you are shift-stitching with any lens, distortion is not automatically dealt with, and you have to worry about the performance of the lens further out, which tends to get bad pretty quickly with most of the relevant designs but not all. And you need to also deal with the changing effects of angle of incidence on the color balance and intensity of the image recorded at various points within the image, particularly with the Kodak sensors. These factors are part of the reason that I favor camera re-aiming stitching and use of the SLR system, despite the appeal of cameras like the very lovely ALPA Max, or the extremely capable ARCA R m3d, or the very handy Sinar arTec, one of which I would favor, were I doing architectural work. Even after more than two years weighing the pros and cons of the medium-format systems, I still can't say which of those three I would purchase for that situation. They are about equally appealing. One of each perhaps? Just kidding — with the cost of the unique lenses for each, that idea is entirely prohibitive.